When you’ve spent many hours constructing and painting a locomotive it’s worth while spending a few hours more providing a crew that really complement the model. They should be as life-like as possible and be posed so they look as if they belong in the cab. And they should be as carefully and lovingly painted as the engine itself. No engine should run without a model driver and fireman in the cab, they enhance the feeling of reality and help bring the model to life. I’m sure that somehow engines run a little smoother with a well painted crew; and if the brake van of the train has a guard on the look-out then collisions and derailments are likely to be minimised too.
 |
| Pl.1 Bringing the brake van to life "...a guard on the look-out" |
Preparation and Assembly.
Give yourself a flying start with thorough preparation for painting by following the steps outlined below, don’t be tempted to cut corners; sound preparation is the basis for a good paint job. Most white metal figures have some residual mould marks, though there should be no pronounced “stepping” or “flash” on the castings. Mould marks should be scraped off with the flat of a straight craft knife blade, a slightly curved blade will help in folds and creases, there should be no need to use a file. Then, any holes that need deepening to take the spigots that locate the arms should be drilled, starting with a small drill and then enlarging the hole to the appropriate width and depth.
I invariably mount figures on a cocktail stick for painting, it’s by far the best way of handling the castings while working on them. Once it has a handle you can twiddle the casting in every plane, without touching the paint job, as you work. I simply drill an appropriate sized hole in the figures bottom and push a cocktail stick into this to form the handle; the hole can be filled with Milliput when the figure is finished and dry then disguised with a dab of paint.
Some figures have separately cast arms so the figures can be assembled in a variety of poses as required, similarly in certain cases the head is a separate casting, allowing even more variety. Arms and heads can be either glued in place or soldered on. Araldite Rapid 5-Minute epoxy glue serves well and allows for some adjustment before the glue sets.
Soldering Techniques for White Metal.
If solder is used for assembly then ultra low-melt solder that melts at 70°, well below the melting point of the white metal castings, must be used. You’ll need a special soldering iron for this job; I use an ANTEX White Metal Master and solder arms heads and shovels in place and often solder the figures to thin sheet metal bases too, providing you don’t dwell with the iron you won’t melt the castings.
As a flux I use Fluxite solder paste because I can see it better than liquid flux on these tiny components; it’s greasy but washes off white metal easily with a little IPA. To solder white metal components together, first scrape the two surfaces that are to be joined with a knife blade to bright metal then apply flux to these areas and hold the components together, if necessary, with your fingers. Pick up a blob of ultra low-melt solder on the tip of the iron and run it round the joint, it will join and fill at the same time.
All my figures, except those that are designed to lean against something, will stand on their own two feet and though they don’t need a base they do need to be fastened down either by simply gluing them to the ground or with the help of tiny pins set into holes drilled in the soles of the feet. In the case of loco crew I prefer to solder the figures to a small metal base cut from 0.25mm nickle silver sheet and to tailor the shape of this to the position of the figure in the cab. The base must first be “tinned” , as you can’t solder straight onto brass or nickle silver with 70° solder. To do this, tiny blobs of 145° solder are melted onto the base where the figures feet will go, this is the tinning process. The 70° solder will adhere to a tinned surface, though not to brass or nickle silver that has not been tinned. Then 70° solder is melted onto the soles of the figure’s feet which is then held in place on the base, and the iron applied which will melt the 70° solder and attach the figure to the tinned base. An Antex White Metal Master iron will cope with the whole process adequately.
Priming the Figure.
When the figure is assembled the next step is to degrease it using IPA (see note below) or turpentine and to prime the casting with matt grey enamel paint, which should be scrubbed on vigorously with an old brush; white metal of course takes paint far better than brass or nickle silver. Any metallic surfaces, such as shovel blades, should be left as bare metal and be given a light brush over with a brass bristled suede brush to brighten the metal of the casting, the intention being to represent metallic surfaces with the actual metal of the casting.
 |
| Pl.2 Figures mounted on cocktail sticks, from cleaned-up casting to finished figure. |
Note: IPA= Isopropyl Alcohol. A relatively non-toxic, water soluble solvent and cleaner that evaporates quickly.
Paints and Materials.
I always paint with enamels, Humbrol, Revell, Phoenix, Railmatch, they’re all inter-mixable and I make no distinction. Of course acrylics can be used just as effectively, I’ve simply never used them. You need a fair sized palette; mine’s a 9”x 7”sheet of Perspex. Turpentine is used to thin the enamel though you can use a proprietary thinner, I have a bottle of Revell “Colour Mix” here on my desk which works well. White Spirit has no place in the studio, it should not be used to thin paint but should be kept in the workshop for cleaning brushes. A block of "Brush Cleaner" is useful in the studio for rescuing abused brushes.
I use a wide selection of brushes. I use cheap bristle brushes for jobs where I need to scrub the surface of the casting, either buffing colours or scrubbing paint on. There’s a good deal of dry brush work involved in painting figures which shortens the life of brushes alarmingly, and for this I use either sables that are past their best or synthetic hair brushes. I keep a few sable brushes that are in good condition for fine detail work, though I rarely use a brush smaller than 00 and indeed most of my fine work is done with a nicely pointed sable size 0.
Painting Figures in 1:43 scale; General Remarks
Painting figures is quite different to painting locomotives but is really not that much different from painting goods wagons, though there’s no airbrushing involved, the basic idea is similar in that you lay down a basic colour and then work into this with both wet paint and dry brush work. Initially however I suggest you paint the figure simply, without any shading or highlighting. It’s more important that the colours work and the paint quality is attractive at this stage than rushing into complications with lining, highlighting and shading, which I’ll deal with later.
You need a basic palette of colours, all of them matt. There’s no need to use gloss paint, any shiny areas can be touched in with varnish later. When the matt paint is well and truly dry I often take a large bristle brush and lightly brush the figure, or parts of it, with it. This enlivens the paint a little and gets rid of the chalky lifeless surface quality of matt enamel without compromising the dull realistic surface finish; it's a tecnique that can be used on shoes and on shovel handles, to enliven them without using varnish.
This is a list of basic colours that I start with…
White and black.
Red, yellow and blue…the primary colours.
Brown…two contrasting browns are useful.
Gold, silver and gloss or eggshell varnish.
I think it’s a good idea to make up a pot of flesh colour too; you need it every time you paint a figure, but mix it yourself, a nice deep colour; don’t rely on what the paint manufacturer calls “flesh”.
I supplement this list with other colours as the occasion demands, always matt and occasionally even adding a touch of Artists Oil Colour if necessary.
Mix colours on a palette; put the paint onto the palette after stirring the tinlets with a twizzler, which can also be used to transfer paint to the palette, then mix the paint to the colour required and thin it to the desired consistency. The paint should flow freely, in fact you should be able to write your name with it, it shouldn’t pull or drag on the surface you’re painting. Keep the paint fairly thin as you can’t paint a figure with just one coat, the effect has to be built up gradually with at least two layers of thin paint; remember that the consistency of the paint is probably the most crucial aspect of painting.
Four Key Essentials
1. A set of good brushes
2. Paint thinned to the right consistency
3. Clean fresh colours avoiding “sludge”.
4. A good handle.
 |
| Pl.3 Clean fresh colours; the wrench is burnished and varnished. |
Painting in 1:43 scale; A Detailed Case Study.
Now let us deal with the sequence of painting a figure in detail. I’ve chosen as a case study, a goods yard shunter, posed with his curly shunter's pole and chalk (below Pl.4 & Pl.5). He's a typical railway figure with plenty of interesting features that will allow me to "Show You How…"
 |
| Pl.4 My Case Study; the components prior to assembly. |
The shunter has no separate base, he stands on his own feet with a little help from his pole. The pole is cast white metal and needs a nickle silver wire hook adding. To do this I drill the top of the pole carefully 0.45mm, then I "tin" a short length of n/s wire and solder it in place with 70° ultra low-melt. Then I bend the wire into a "hook" with round nosed pliers. I draw the edge of a file down the pole to simulate the texture of a wooden pole. The hand needs opening out a little to accept the pole and this I do gradually with a drill, knife and oval file.
 |
| Pl.5 Assembled and primed shunters. |
I’ve dealt with cleaning, assembly, priming and mounting the figure on a handle in some detail earlier so I’ll presume that we’re ready to start painting…I’m going to use fresh clean colours, none of which answer to the name “sludge” and I’m not going to even think about weathering or “dirtying up” the figure at this stage nor am I going to line or shade him.
I always paint the face and hands first as "flesh" is probably the hardest colour we need to mix. I use the twizzler to put small pools of matt white, yellow, red and blue on the palette. Then I mix a reddy purple from the red and blue and add white to lighten it and yellow if necessary to make it more flesh coloured. Try a blob of paint on the back of your hand to test the colour and tone, it shouldn’t be too light and pinky… err rather on the dark side, but resist any temptation to dot the eyes in with black or paint a black line under the nose; this is known as "black banana style"!
When you’ve mixed a satisfactory flesh colour then paint the face and hands, you can’t be quite sure of the effect however until you paint the adjacent colour, at the moment you’re seeing the flesh colour against the primer. When the waistcoat is painted in the effect of the flesh colour can be judged more accurately.
Most of the colours I'll be using can be described as neutral colours, these were the colours of clothes in the Railway Age, they’re fairly close together, greys, browns and beiges; blue, though stronger, is never used stridently, it has to be controlled to harmonise with the neutrals. We’ll rarely be going as high in the tonal range as pure bright white, nor down to dark black for that matter, nevertheless we need to use contrasting tone and colour to add interest and life to painted figures.
You’ll probably find that two thin coats of colour on top of the undercoat, with a few hours between each to allow the paint to dry, ensures a better result than one thick coat.
I first mix a colour for the waistcoat, a dark blue, mixed simply by adding black to blue and I paint his jacket and his cap at the same time, touching in the peak of the cap with black. The arms of the waistcoat are painted very dark grey, a mixture of black with a little white added. The flesh colour can now be seen against the dark of the cap and jacket which will certainly point up any deficiency in your flesh colour; if it is too light, darken it with a touch of red and blue and repaint the face and hands.
I mix a light grey next and paint the trousers, thus creating a contrast between the two largest areas of colour, the light trousers and the dark waistcoat. The figure’s shirt is white but if I paint it with white straight from the pot it’ll be too bright so I restrain the colour by adding a little black and a hint of yellow, just enough to give colour to the grey I’ve made. You can even try adding touches of blue and red to white and other light colours to tone them down…just adding black to darken a colour can have a deadening effect on the colour scheme.
There remains the hair, which I paint mid-brown along with the shoes and the wooden pole, though I vary the shade and tone of brown in each case to subtly maximise variety. The shunter is a smart lad and wears a tie which can be painted red or any other colour that will enlived the colour scheme... but not too bright mind.
The waistcoat buttons, cap badge and watch chain are silver and are best painted first with a very dark silver, that is silver paint darkened with black. When this is dry a lighter silver is brushed on top, without obscuring the underlying darker tone, to create an effect of relief.
The hook of the shunter's pole is simply left bare metal, I don’t paint it, rather I let the metal of the casting stand for the metal of the hook. Afterwards I varnish the hook as well as the black peak of the figure's cap and his shoes, though using a restrained satin varnish rather than a bright gloss. Oh, and I almost forgot the stick of chalk in his hand...don't forget to paint the chalk.
 | ||
| Pl.6 Finished figures, no lining or shading... including my "case study" shunter second left. |
All five of these figures are painted in the simplest style possible... in flat matt colours with a little touch of varnish here and there. The relief of the sculpture itself has been allowed to create its own three-dimensional effect, unaided by any shading or lining. The shovel blades and the hook of the shunter's pole are not painted, they are all burnished bare metal.
 | ||
| Pl.7 Shaded and lined figures alongside their unlined and unshaded counterparts. |
In this group I have paired up a lined and shaded figure with a simply painted one, so you can compare the effect and decide for yourself whether it's a good idea to go the extra distance. I think a certain amount of lining and subtle shading is worthwhile but it should be very subtle and not overdone.
 |
| Pl.8 You can examine the differences in the painting styles in this close-up in some detail |
 |
| Pl.9 Shading and lining has been added to both these figures. |
Notes on Lining and Shading Figures.
The aim of lining and shading is to enhance the relief of the sculpture, it needs to be done subtly on these small figures, so it's hardly noticeable and should not exaggerate the relief in too obvious a manner. It's really up to the individual to decide just how much lining and shading a figure needs. If the sculpture is crisp and the details well modelled then the lining will be easier to do as the lining brush will follow easily along well-defined edges. Similarly, well executed sculpture makes it easier to dry-brush over the detail to bring out the relief.
If I describe how I paint a face, then a jacket, I'm sure you'll get the idea. I always deal with the face first by mixing blue and red into a mid-purple that I run round the neck, under the cap round the hair, moustache and ears and let it flow into the eyes and mouth, wiping any excess off with a dry brush. Then, using my pot of flesh colour, I lighten a blob with white on the palette and dry-brush very lightly with a very dry brush over the detail of the face to bring out the relief. I might try a touch of light flesh on the chin, nose and ears too, and a tiny blob of pinky-flesh to put some colour into the cheeks. I treat the fingers in a similar manner with the same colour.
I outline under the edge of the jacket, round the lapels, buttons, pockets and the creases in the sleeves and the jacket front and back with dark blue, darker than the base colour of the jacket. The paint must be thin enough to flow freely; I work quickly as I twiddle the figure on its handle. Then I mix a lighter blue, thicker this time, and let it dry a bit before using it to dry-brush over the creases, lapels and edges of the jacket. I refine the effect with a wet brush and finish off by painting a few highlights, lapels, pocket edges and the like, with nicely free flowing paint. I consider the effect once more and refine it as needs be with both a wet brush dipped in thinners and once more with a dry brush. Dry-brushing should be carried out with a very dry brush for best results and sparingly, building up the effect bit by bit, with great restraint.
 |
| Pl.10 Driver and fireman... a study in shades and tones of blue. |
If you mounted figures on a base like the pair above, then paint this to match the floor of the cab. I use double-sided sticky tape under the base to keep the figures in position which allows me to remove them from the engine if necessary.
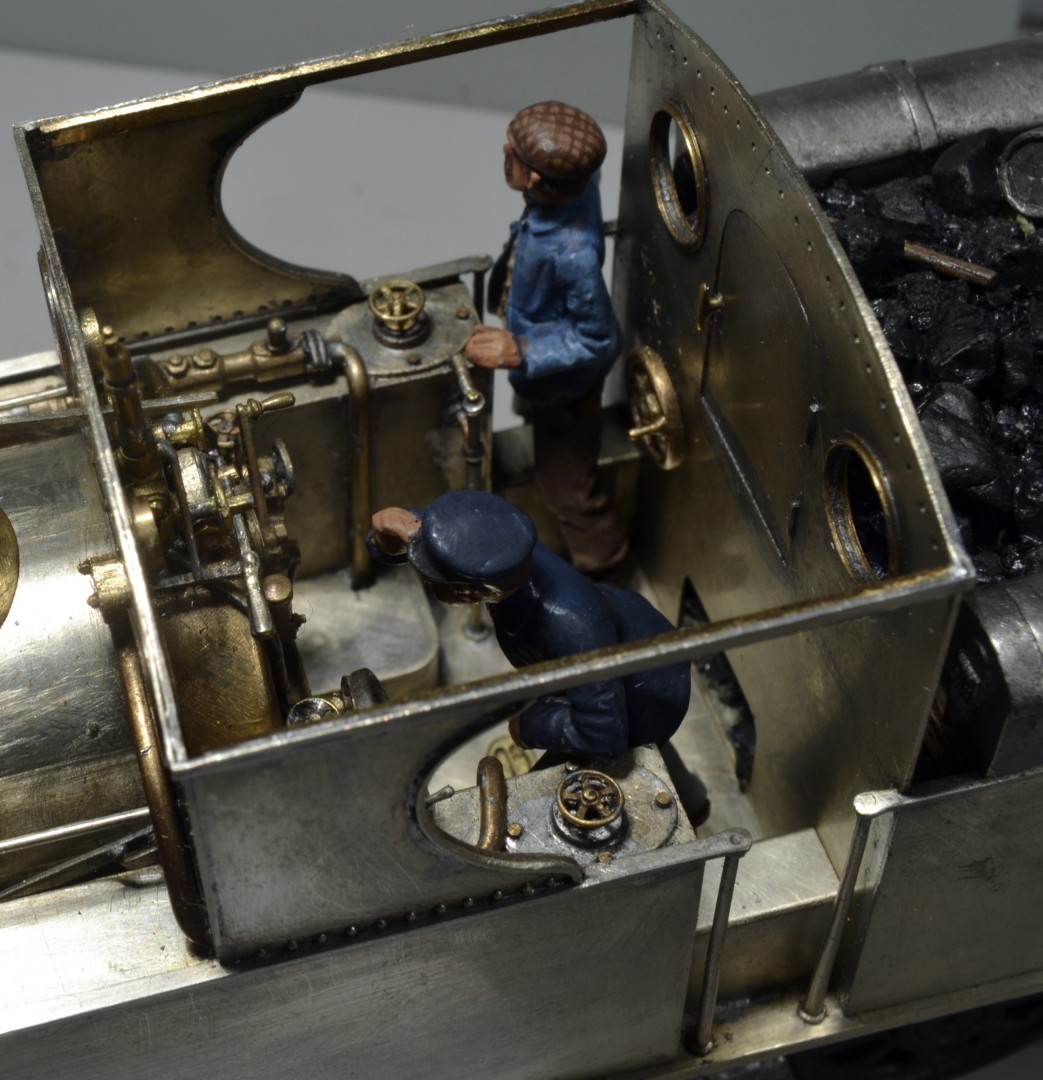 |
| Pl. 11 LNWR Coal Tank crew in action. |
The crew of the Coal Tank are designed to make the best use of the tight confines of the cab of this little engine, they are posed so as to maximise the effect of space in the cab. The driver on the left is painted very simply without any lining or shading ; his fireman who stands in the doorway half out of the engine is more in evidence and has been lined, shaded and given a checked cap. The fireman stands freely though the driver, a more complex pose, is soldered to a small base and held in place with double-sided sticky tape.
Note: All the figures featured in "Painting Figures" are from Pete's "Heroes of the Footplate" range and are now available from www.invertrain.com
PA.2013 End
A thousand thanks for this article. It's invaluable.
ReplyDeleteI'll echo that - very useful, even for a 4mm modeller. Thanks!
ReplyDelete